Build and Share Android Apps with Ease Using GitHub Actions

I am a passionate and self-taught Android Developer who has good experience in AOSP, Native Android Apps (Java/Kotlin), Android for Embedded, Android in IoT, and Linux Kernel. I am more inclined to open-source, leading me to contribute to a few open-source projects. Sometimes I work in automation, scripting, and bots for myself.
Introduction
Imagine you are building a super cool android app!
You want to share it with your friends so you have to generate a signed version APK and share it with your friends yourself.
In the beginning, You will share an initial build with your friends. That won't take much time.
Eventually, you will make many changes in your app and want to share the APK with your friends for each change or each release. You may feel bored or it consumes a lot of time since you have to do the work manually to compile and share the APK. You will be tired of sharing the APK since you have to do the same steps every time.
Don't worry! We will automate the process of building, signing and sharing the APK using GitHub Actions, a feature of GitHub.
Prerequisites
Git
GitHub
Basics of Android App Development
Basics of shell commands (if no, still you can do it my windows users)
Basics
GitHub Actions
GitHub Actions is a continuous integration and continuous delivery (CI/CD) platform that allows you to automate your build, test, and deployment pipeline.
You can set up workflows for your project and trigger it based on repository events like push, and pull requests etc.
Workflows are nothing but a set of actions/commands defined by the user that will be executed in the GitHub-provided virtual machines for your project.

To learn more about GitHub Actions, Check here.
Guide
In this guide, you will learn how to set up workflows in your GitHub repository. Make sure you have a GitHub repository that contains your project source files.
Setup workflow in your repository
1) Open your GitHub repository in your browser
2) Select the 'Actions' tab

3) Click 'set up a workflow yourself'

4) It will create a new file named main.yml in <project_root>/.github/workflows. You can rename it as your wish.

5) Now, you have to configure the instructions in the file editor to create a workflow.
Note: YAML language is used here. In case you want to learn more about it, check here.
We gonna use GitHub workflow syntax to write the YAML code. To learn more about that, check the official doc.
Let's write step-by-step.
Note: Changes in each step happen in the same file. So add code continuously in the same file. You can find the complete YAML code at the end of the guide.
Set the name of the workflow
name: Build AppIt will be shown in the 'Actions' tab.
Configure in which repository event, you have to run your workflow.
on: push: # Trigger only for main branch. branches: [ main ] # Allows you to run this workflow manually from the Actions tab workflow_dispatch:onis used to define which event you want to trigger your workflow.Here we configured it to trigger the workflow on push commits to the main branch.
workflow_dispatch:is enable us to trigger the workflow manually in the actions of the repository.
Now you have to define a job to do our task in the Runner (Virtual Machine).
Job is a set of steps that will be executed in the Runner (Virtual Machine).
A step may be a shell script or set of shell commands or an action.
For our task, we gonna define a job with three steps.
Clone the project
Build the APK
Sign the APK
Send the APK
First, define our job
    jobs:
      build:
        runs-on: ubuntu-20.04
It will configure a job named build it will be run on a ubuntu-20.04 machine.
Now define our three steps one by one inside the build job
Clone the project
  jobs:
    build:
      runs-on: ubuntu-20.04
      # Steps definition starts here
      steps:
        # Get the app source
        - name: Get the source
          uses: actions/checkout@v2
Here, we are using GitHub's official checkout action to clone our project source code in the runner (VM).
As we know,
name:defines the name of the stepuses:- tells which action needs to be run.
Build the APK
          # Compile the apk
        - name: Generate Release APK
          run: ./gradlew assembleRelease
with
run:, you can define shell commands to execute in the step.Here we build the release APK by using the Gradle wrapper.
Sign the APK
        # Sign the apk
        - name: Sign APK
          uses: r0adkll/sign-android-release@v1
          # ID used to access action output
          id: sign_app
          with:
            releaseDirectory: app/build/outputs/apk/release
            signingKeyBase64: ${{ secrets.SIGNING_KEY }}
            alias: ${{ secrets.ALIAS }}
            keyStorePassword: ${{ secrets.KEY_STORE_PASSWORD }}
            keyPassword: ${{ secrets.KEY_PASSWORD }}
          env:
            # override default build-tools version (29.0.3) -- optional
            BUILD_TOOLS_VERSION: "31.0.0"
For signing the APK, we gonna use the r0adkll/sign-android-release@v1 action.
id- Unique ID of the step so we can refer to and get the output of the step in another step.with- It is used to provide the input for the action used in the step.In our case, we have to provide the key information to the action to sign the APK.
Some information is highly confidential so we can't add it to a public file, right? so we gonna use repository secrets for this. Let's see how to do it later.
For now, just know how to use the repository's secret here.
${{ secrets.<KEY_NAME> }}- Use this way to get your repository secret.The following are the inputs required for this action. Refer here.
releaseDirectory- Release APK directorysigningKeyBase64- The base64 encoded signing key used to sign your appThis action will directly decode this input to a file to sign your release with. You can prepare your key by running this command on *nix systems.
openssl base64 < some_signing_key.jks | tr -d '\n' | tee some_signing_key.jks.base64.txtThen copy the contents of the
.txtfilealias- The alias of your signing keykeyStorePassword- The password to your signing keystorekeyPassword- The private key password for your signing keystoreenv- This is used to define the environment variables required for a step. In our case, we have defined theBUILD_TOOLS_VERSION(optional).
Share the APK
In the previous step, we generated the signed APK successfully. Now it's time to send the APK somewhere so you share it easily.
Two cases:
Directly send the APK
Upload the APK to some file transfer service and send the link
We gonna see both cases.
Case 1: Directly send the APK to a messenger like Telegram or Discord.
You can use any messenger but know about its API.
Here we gonna send our APK to a Telegram Chat via Bot API. I ain't gonna explain about Telegram Bot API since it's out of track. You can learn it from here.
              # Send to the APK to Telegram
              - name: Send the APK to Telegram
                env:
                  APK_PATH: ${{steps.sign_app.outputs.signedReleaseFile}}
                  BOT_API_KEY: ${{ secrets.BOT_API_KEY }}
                  CHAT_ID: ${{ secrets.CHAT_ID }}
                run: |
                  curl -F chat_id=$CHAT_ID -F document=@"${APK_PATH}" -F caption="Template-$(date +"%Y%m%d-%H%M")" https://api.telegram.org/bot${BOT_API_KEY}/sendDocument
env- Here we have defined the environmental variables required for this step.APK_PATH- Get it from the previous step. See the use ofidthat we defined in the previous step.BOT_API_KEY- Your bot API key that you got from the Bot Father. Get from repository secrets.CHAT_ID- ID of the telegram chat to where you want to send the APK. It can be a group, channel or your ID. Get from repository secrets.Note: It's not the username of your chat or group. It's a numerical value that you can get by using some other bots.
run- It contains the list of shell commands that we need to execute in this step.Here, we send the APK by making a request to the Telegram BOT API with cURL tool. Customize on your needs.
Case 2: Upload the APK to some file transfer service and send the link
In this case, we gonna upload our APK to a file transfer service like GoFile, WeTransfer etc and then send the link to a messenger. Here I gonna use Telegram.
              # Upload the APK to WeTransfer and send link to Telegram
              - name: Send the APK to Telegram
                env:
                  APK_PATH: ${{steps.sign_app.outputs.signedReleaseFile}}
                  BOT_API_KEY: ${{ secrets.BOT_API_KEY }}
                  CHAT_ID: ${{ secrets.CHAT_ID }}
                run: |
                  # Get the transfer script to upload the apks
                  curl -sL https://git.io/file-transfer | sh
                  # Upload and get the link
                  LINK=$(./transfer wet $APK_PATH | grep "Download Link" | sed 's/Download Link://g')
                  # Create a message
                  MESSAGE="Template $(date +'%Y-%m-%d %H:%M')\n\nLink: ${LINK}"
                  # Can't make the telegram markdown working
                  TEXT=$(echo -e $MESSAGE)
                  # Send the message to telegram
                  curl -F chat_id=$CHAT_ID -F text="$TEXT" -F disable_web_page_preview=true https://api.telegram.org/bot${BOT_API_KEY}/sendMessage
Here we are using this tool to upload our APK to WeTransfer and then send the link to Telegram chat or channel.
Final workflow code for case 1: [main.yml]
name: Build App
on:
  push:
    # Trigger only for main branch.
    branches: [ main ]
  # Allows you to run this workflow manually from the Actions tab
  workflow_dispatch:

jobs:
  build:
    runs-on: ubuntu-20.04
    steps:
      # Get the app source
      - name: Get the source
        uses: actions/checkout@v2

      # Compile the apk
      - name: Generate Release APK
        run: ./gradlew assembleRelease

      # Sign the apk
      - name: Sign APK
        uses: r0adkll/sign-android-release@v1
        # ID used to access action output
        id: sign_app
        with:
          releaseDirectory: app/build/outputs/apk/release
          signingKeyBase64: ${{ secrets.SIGNING_KEY }}
          alias: ${{ secrets.ALIAS }}
          keyStorePassword: ${{ secrets.KEY_STORE_PASSWORD }}
          keyPassword: ${{ secrets.KEY_PASSWORD }}
        env:
          # override default build-tools version (29.0.3) -- optional
          BUILD_TOOLS_VERSION: "31.0.0"

      # Send to the APK to Telegram
      - name: Send the APK to Telegram
        env:
          APK_PATH: ${{steps.sign_app.outputs.signedReleaseFile}}
          BOT_API_KEY: ${{ secrets.BOT_API_KEY }}
          CHAT_ID: ${{ secrets.CHAT_ID }}
        run: |
          curl -F chat_id=$CHAT_ID -F document=@"${APK_PATH}" -F caption="Template-$(date +"%Y%m%d-%H%M")" https://api.telegram.org/bot${BOT_API_KEY}/sendDocument
Final workflow code for case 2: [main.yml]
name: Build App
on:
  push:
    # Trigger only for main branch.
    branches: [ main ]
  # Allows you to run this workflow manually from the Actions tab
  workflow_dispatch:

jobs:
  build:
    runs-on: ubuntu-20.04
    steps:
      # Get the app source
      - name: Get the source
        uses: actions/checkout@v2

      # Compile the apk
      - name: Generate Release APK
        run: ./gradlew assembleRelease

      # Sign the apk
      - name: Sign APK
        uses: r0adkll/sign-android-release@v1
        # ID used to access action output
        id: sign_app
        with:
          releaseDirectory: app/build/outputs/apk/release
          signingKeyBase64: ${{ secrets.SIGNING_KEY }}
          alias: ${{ secrets.ALIAS }}
          keyStorePassword: ${{ secrets.KEY_STORE_PASSWORD }}
          keyPassword: ${{ secrets.KEY_PASSWORD }}
        env:
          # override default build-tools version (29.0.3) -- optional
          BUILD_TOOLS_VERSION: "31.0.0"

      # Upload the action artifact
      - name: Upload the APK (artifact)
        uses: actions/upload-artifact@v2
        with:
          name: Template
          path: ${{steps.sign_app.outputs.signedReleaseFile}}

      # Upload the APK to WeTransfer and send link to Telegram
      - name: Send the APK to Telegram
        env:
          APK_PATH: ${{steps.sign_app.outputs.signedReleaseFile}}
          BOT_API_KEY: ${{ secrets.BOT_API_KEY }}
          CHAT_ID: ${{ secrets.CHAT_ID }}
        run: |
          # Get the transfer script to upload the apks
          curl -sL https://git.io/file-transfer | sh
          # Upload and get the link
          LINK=$(./transfer wet $APK_PATH | grep "Download Link" | sed 's/Download Link://g')
          # Create a message
          MESSAGE="Template $(date +'%Y-%m-%d %H:%M')\n\nLink: ${LINK}"
          # Can't make the telegram markdown working
          TEXT=$(echo -e $MESSAGE)
          # Send the message to telegram
          curl -F chat_id=$CHAT_ID -F text="$TEXT" -F disable_web_page_preview=true https://api.telegram.org/bot${BOT_API_KEY}/sendMessage
6) Now commit the changes by clicking the 'Start commit' button.

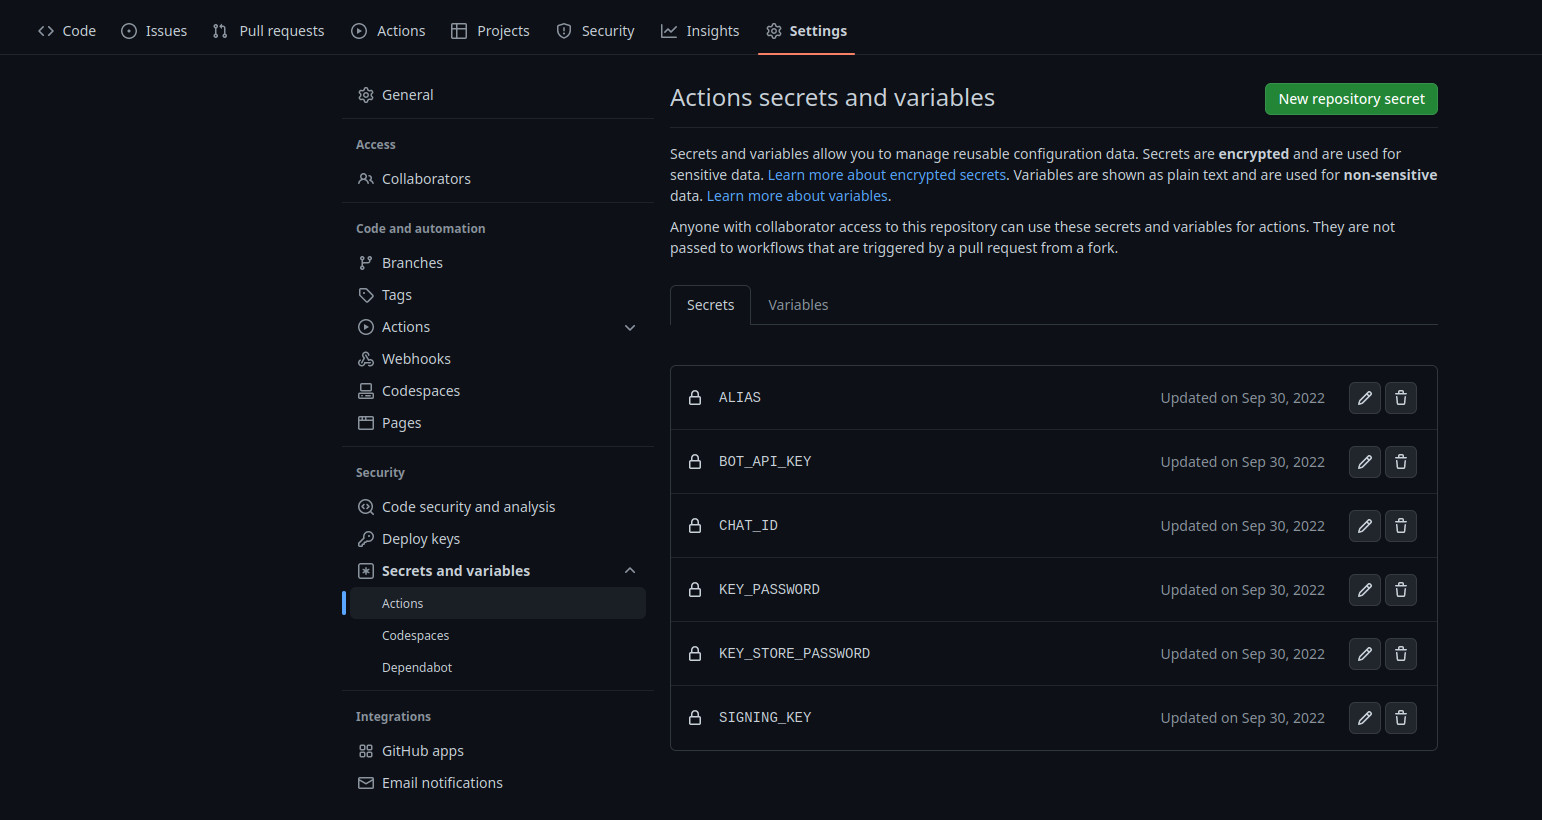
7) Add repository secrets
Open the Settings tab in the repository
Click Secrets and Variables under the 'Security' section
Open Actions
Add the required secrets with the proper keys used in the workflow (main.yml).
8) Now you can verify your action by making repository events like pushing new commits or by manually running it from the 'Action' Tab.
Bonus: Multiple APK
In case, you are building multiple APKs for your project, then use this workflow code as a reference.
name: Build App
on:
  push:
    # Trigger only for main branch.
    branches: [ main ]
  # Allows you to run this workflow manually from the Actions tab
  workflow_dispatch:

jobs:
  build:
    runs-on: ubuntu-20.04
    steps:
      # Get the app source
      - name: Get the source
        uses: actions/checkout@v2

      # Compile the apk
      - name: Generate Release APK
        run: ./gradlew assembleRelease

      # Sign the apk
      - name: Sign APK
        uses: Dhina17/sign-android-release@master
        # ID used to access action output
        id: sign_app
        with:
          releaseDirectory: app/build/outputs/apk/release
          signingKeyBase64: ${{ secrets.SIGNING_KEY }}
          alias: ${{ secrets.ALIAS }}
          keyStorePassword: ${{ secrets.KEY_STORE_PASSWORD }}
          keyPassword: ${{ secrets.KEY_PASSWORD }}
        env:
          # override default build-tools version (29.0.3) -- optional
          BUILD_TOOLS_VERSION: "31.0.0"

      # Upload all APK variants to GoFile and send links to Telegram
      - name: Send the APK to Telegram
        env:
          APK_VARIANT1: ${{steps.sign_app.outputs.signedReleaseFile0}}
          APK_VARIANT2: ${{steps.sign_app.outputs.signedReleaseFile1}}
          APK_VARIANT3: ${{steps.sign_app.outputs.signedReleaseFile2}}
          APK_VARIANT4: ${{steps.sign_app.outputs.signedReleaseFile3}}
          BOT_API_KEY: ${{ secrets.BOT_API_KEY }}
          CHAT_ID: ${{ secrets.CHAT_ID }}
        run: |
          # Get the transfer script to upload the apks
          curl -sL https://git.io/file-transfer | sh
          # Upload and get the link
          LINK1=$(./transfer wet $APK_VARIANT1 | grep "Download Link" | sed 's/Download Link://g')
          LINK2=$(./transfer wet $APK_VARIANT2 | grep "Download Link" | sed 's/Download Link://g')
          LINK3=$(./transfer wet $APK_VARIANT3 | grep "Download Link" | sed 's/Download Link://g')
          LINK4=$(./transfer wet $APK_VARIANT4 | grep "Download Link" | sed 's/Download Link://g')
          # Create a message
          MESSAGE="Template $(date +'%Y-%m-%d %H:%M')\n\narm64: ${LINK1}\narm: ${LINK2}\nx86_64: ${LINK3}\nx86: ${LINK4}"
          # Can't make the telegram markdown working
          TEXT=$(echo -e $MESSAGE)
          # Send the message to telegram
          curl -F chat_id=$CHAT_ID -F text="$TEXT" -F disable_web_page_preview=true https://api.telegram.org/bot${BOT_API_KEY}/sendMessage
Here, is a small change in the signing APK step, I have used my fork Dhina17/sign-android-release since multiple APK signing needs some changes. The original repo is not active to accept the contribution so.
You can understand this with my previous explanations.
I hope you can save your valuable time in building and sharing apps with your friends and testers.
Add your valuable feedback in the comments.
Thanks for reading. <3